Day: April 21, 2009
Weather report: low-70’s today, humidity 100% wind is about 5 SE, partly cloudy with a chance of thunderstorms and wind gusts 10-20 W
CHANGE! PT formation was at 0530hrs. It was cold this morning before we got started at 42 degrees with only shorts and a short sleeve t-shirt on. We ran an on track run for 4 miles. Then we headed for the grassy area in front of the 250’ towers. It is like they are the guardians of the Airborne Trainee’s. The grass was extremely cold after we had been sweating from the run and the morning dew drenched us rolling around doing the following exercises; 100 four count flutter kicks, crunches, left/right crunches, 100 side-straddle hops (jumping jacks), side planks for 1 minute each side, and push-ups. Yesterday off-post personal were told to report with a clean uniform and hygiene gear to formation; that no one would be allowed to return to their room. That changed after PT we were allowed to go back and get cleaned-up and to report back at 0830hrs for training. For breakfast I had the usual; raisin bran, gogurt, Motrin, and water. Believe it or not I am not too sore after yesterday’s training, it may set in later. I have no clue about what we are doing today. They do not communicate very well around here, and leave us with the deer in the headlight look all the time.
Formation went off at 0830hrs with out a hitch. We moved out to the training area after a half mile run in boots and helmet. Our first block of instruction for the day was on the proper way to rig our rucksack or Alice pack for a combat jump. To start on the combat assembly of your rucksack you need to ensure you have all the components to complete the task. A rucksack, lowering line, single attachment harness, weapons carrying case, two adjuster straps, and a quick release. I will start with the lowering line assembly; you will need to fully extend the lowering line. Once it is laid out and free of twists you can begin “S-rolling” it until it is nicely rolled and able to fit in the Velcro strap with no more than 1/4” exposed out either side, any additional strap that will not even-up should be placed in the Velcro and securely shut. Grab your ruck and put it face down. Secure the left shoulder strap completely down tight. Now that you have completed that task you move on to the harness assembly. With the harness spread out completely, face-up, you will need to gather your adjuster straps and female ends of your leg straps. The leg straps are used to keep the rucksack attached to your body as you exit the aircraft, without them attached properly the pack would fly up and hit you in the face, would not be a good day. Place the hooks on the adjuster straps face down at the harness end. Located at the end of the adjuster strap is a metal attachment ring, you will place it over the white loop. There are three loops that must be threaded thru each other to make the release assembly work. Place it over the white loop, thread the green or gray loop and then thru the red loop. At this point you will thread the red loop thru the grommet hole on the female leg strap with the stow pocket facing upward. This completes one side. Finish the other side and move onto the release strap. Make sure that the strap is not crossed over, twisted, or routed around itself. It must be attach with the Velcro strap cover and then route thru the red loops on the leg straps and placed into the stow pockets. Now that the release is complete, flip the harness completely over. Grab your rucksack and turn it upside down with the kidney band facing your pelvic bone. Find the end of the harness and place the center front pocket on the center of the harness. Next you will find the tie down straps, leg straps and strap fasteners with static buckles. Route the tie down strap between the rucksack frame and the rucksack. You will cross the strap over the top of the rucksack cross bar. Thread the static fasteners between the fame and rucksack from the bottom this time. Ensure that none of the straps are crossed and cinch them down, but not all the way. When you feel it is snug flip the pack over. The center pocket should be sticking out of the harness, if not adjust it so it does so. This will increase the stability of the harness and ensure your ruck does not fall out onto other jumps or away from you. This is your means of survival in a combat environment. Now that the harness is correctly positioned flip the ruck back over and get all the slack out as possible. Finish the static fastener by inserting a quick release into the strap. This is done by overlapping the strap on top of itself and leaving a three to four inch loop. When the loose end is pulled the strap will release and allow you to get your ruck on. S-roll the excess and place a retainer band on over the excess. A check to see if your straps are tight enough is to try and put your fist under the straps, if you can tighten them more. You do not want anything flapping in the wind that could cause a chute malfunction or fly up and hit you in the face. Cinch up and complete the s-roll on the other side. Once completed you will need to get your lowering line again, with your pack facing down take the loop end of the lowering line and thread it underneath the ruck harness, DO NOT put it under the frame it will not work and you will ride your combat into the drop zone. This is not a bad thing but it will make your landing much harder. Once the lowering line has been routed run the loose end thru the loop and attach it to the left side of your pack, as if you were wearing it, with retaining bands, and attach the clip end to the bottom of your ruck. Connect your leg straps male end to the female end on the bottom of your ruck. Snug them up and roll the straps. These are the only straps on your entire harness that can be rolled, but for good measure and to keep everything simple I s-rolled these as well. Your rucksack is now ready for the jump. Now to attach it! With your five point parachute harness and reserve on, hook the adjuster straps underneath the reserve to the outside of the reserve clips on the five point harness, you will then attach the lowering line thru the weapons carrying case and to the outside for the adjuster strap on your left side harness ring. The force of the pack being released with break the retainer bands allowing your rucksack to be lowered twelve feet below. With a slap down and away you will activate your quick release on your weapon carrying case; a tug on the rucksack harness release will drop all of your equipment away from you and allow you to make a safe PLF. Formation and a half mile run back!
Lunch time! I had Salisbury steak with mashed potatoes and gravy, steamed carrots, bread, two glasses of PowerAde, and a piece of pound cake with chocolate icing. It was delicious. I was starving so anything would have been good. We had a few minutes to digest and off again! One half mile run and back in the training area.
The next class was on the two hundred and fifty foot tower. They went over the tower command and the actions needed to safe negotiate the tower. They were not able to give us the full class today because of the winds gusting from 17 to 35 mph. We are scheduled to parachute from the tower in the morning after PT. If the winds continue to blow we will not conduct training off the tower. It is a safety issue.
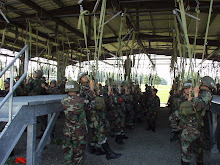
We then conducted training on the mass exit of the aircraft and the proper commands while in the aircraft for a safe and successful exit. On the first jump, each pass over the drop zone we will drop ten people out one door and alternate doors. The next four jumps will be exiting the aircraft on each side with fifteen jumpers per stick, for a total of thirty jumpers in the air on each pass. The commands are as follows. I will give the command and the response followed by the hand signal. The command ten minutes will be give the jumper reach with turning to the forward of the plane stating ten minutes, face the rear of the plane stating ten minutes, and facing the center of the plane while placing their head down and stating ten minutes, the jumpmaster will hold out all ten fingers. The next command is Get Ready, all commands from the jumpers will be to the front of the aircraft, followed by airborne and a foot stomp. Out board personal stand up, this is when all the personal on the outside of the aircraft stand up, two fingers pointed to the outside with a down and up action. In board personal stand up, this is when the personal seated in the center stand up, two fingers toward the inside of the jumpmaster with a down and up motion. Hook-up, during hook up you will place the hook over the cable in the aircraft with the open edge of the hook facing the side of the aircraft, ensure that the double latch is fully seated, grab the top of the static line come down until your hand is eye level, grab the static line make a two inch loop out the bottom of your hand and feed it excess over your shoulder, this motion is your pointer fingers hooked with and up and down motion. Check the jumper to your front and ensure that there are no twists into the first loop of the static line retainer, tap them on the back of the helmet and say safe. Check equipment, this is done by running your hand over the front edge of your helmet to ensure there are no sharp spots, continue to run your hand down your chin strap from ear to ear to ensure it is fastened and tight, check the chest strap buckle, left and right leg strap buckles. Sound off for equipment check, the assistant jumpmaster/safety will start at the rear of the jump line and work his/her way forward. He will slap the last jumper on the buttock and then the jumpers will continue to slap each other until it reaches the first jumper. The first jumper will sound off with a loud; “ALL OK Jumpmaster” and stick his hand in his face until the jumpmaster hits hit hand. The jumpmaster will say, stand-by. The first jumper will hand off his static line and stand in the door with a good jump posture. GO! The jumpers in the stick will begin shuffling forward, hand off the static line to the safety, make the turn and exit the aircraft.
I ate two chicken burritos, two quarts of water, grapes, pineapple, cheese and crackers, and some trail mix. My shoulders are sore from all of the pull-ups and lifting my body weight on the suspended harness trainer yesterday.
Formation in the morning will be at 0530hrs in ACU’s, boots, and helmet. We will head for PIT PT and then straight to the training area; the two hundred fifty-feet tower. Breakfast and lunch will be MRE’s tomorrow. We are going to smell bad tomorrow. The weather is calling for high 70’s and high humidity.
We found out today that during jump week if the weather cooperates we will jump twice on Monday; one Hollywood (no combat equipment) and one combat jump; Tuesday two jumps, Hollywood; and Wednesday one night combat jump. We will be able to sleep in, if you want to call it that on Thursday and start out processing. Friday is graduation and the pinning of the wings. I am having dinner with 1LT Nick Corley and his wife on Friday and am going to ask if he will pin my wings. In order to pin someone with Airborne Wings you MUST be AIRBORNE QUALIFIED. It would be nice to have someone that you know pin you then someone you have only spent three weeks being trained by. I appreciate all the Sergeant Airborne’s have done for us and all of the intense training they have put us through, but it is different. Graduation will be on Friday and last about 30-45 minutes.
PULL-UPS for the day: 60
Subscribe to:
Post Comments (Atom)


No comments:
Post a Comment